Tag: Audio

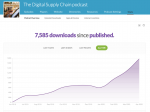
Seven simple steps to better quality podcasts

I published my first podcast, called PodLeaders back in around 2006 and ran it for two years. I have set up and published a several more podcasts since then, including my most recent one, the Digital Supply Chain podcast which I set up in June of last year.

The recent Coronavirus pandemic has brought a halt to my travels and this allowed me to focus more on the podcast, and in doing so I learned a LOT about how to improve the quality of your podcast. The improvement in quality has coincided with a big upswing in listenership, which is nice. Some of this increase may be to do with the uptick in quality, but it is also likely to be that the content is more topical (several Coronavirus impact on supply chain podcasts), and because the frequency of publication has gone up.

Graph of the stats for the podcast

So here is my new and (vastly) improved podcast process, in case it helps anyone else with their podcast (or podcast aspirations!).


Calendly screenshot
Calendly screenshot
  1. Step 1 in my podcast is to schedule the guest interview. This is quite straightforward if the guest is an SAP colleague as I can see their availability on their calendars, and vice versa, but for folks outside the organisation this can be a lot of back and forward, so I set up a Calendly account. Calendly allows people to see and book the available slots on my calendar, and so saves a lot of the to’ing and fro’ing that is otherwise required to find a mutually agreeable time.
  2. Step 2. Once the recording time is confirmed (or sometimes a prep call, followed by the recording), I set up the call on the podcast recording platform Squadcast. Squadcast, like Zencastr records in lossless WAV format for better quality audio, but unlike Zencastr, Squadcast uploads the recorded file live to the cloud for safe storage, as the podcast is happening, and it also has a video interface, so you can see the person you are talking to. I can’t stress enough how much better this makes conversation flow. The video is not recorded (and guests have an option not to turn on their cameras, if they’re not comfortable, or they’re still in their pyjamas!). Squadcast do say they will add an option to record video later this year, so if this is something you need, they will be adding it.
  3. Once the interview has concluded, I download the WAV files from Squadcast, and I run them quickly through the Noise Reduction and Normalisation sound effects in Audacity (an open source audio editing program). The Noise Reduction in Audacity is particularly easy to use, and can quickly get rid of any annoying static, or hissing sounds that may have been picked up.

    Hindenburg Journalist Pro screenshot
    Hindenburg Journalist Pro screenshot
  4. Having exported the cleaned-up files from Audacity, I drop them into Hindenburg Journalist Pro – this is an application which is specifically created for the editing of podcasts. This is the only software I’m aware of which is specifically created for podcast production. Journalist Pro’s user interface does take a little getting used to, but they have great video tutorials online to help get you up-to-speed quickly, and they have a 30 Day free trial, so you can try before you buy. The auto-levelling, the voice profiles, the granular volume controls, are some some of the many reasons this program is a podcaster’s best friend. For reference, before Journalist Pro, I used to use GarageBand, and that is not bad, but because it is a program designed for music editing, there were quirks and work-arounds you had to do all the time when working on podcasts. On the other hand, GarageBand if free if you own a Mac, so that’s something to take into consideration too.
  5. Once the podcast production is completed in Journalist Pro, you can export it directly to your podcast host site. In my case, my podcast host is called Buzzsprout. I have used other podcast hosting sites like Libsyn, and Podbean, but to my mind Buzzsprout is the best of them. And I say this not specifically for any technical reasons, but rather because they go out of their way to make the podcast publication process painless. Not just do they have a nice simple interface for podcast publication, but they also have a great Youtube channel with loads of fantastic tips and tricks to help you set up, or improve your podcast, a cool podcast of their own (duh!), and a useful newsletter. It was via their newsletter that I learned of Journalist Pro, for example. However, when I’ve finished with the production in Journalist Pro, I don’t publish the audio directly to Buzzsprout, instead I export it as a WAV file to my computer.

    Auphonic screenshot
    Auphonic screenshot
  6. I export the WAV file to my disk because I want to improve it a little more. So now, I upload the file to Auphonic. Auphonic is a magic site which just improves your files audio. From the screenshot above you can see the before waveform at the bottom, and the after waveform at the top – the audio levels have been levelled! Not just that, the audio post Auphonic just sounds better. Now it is ready to be published!

    Buzzsprout upload screen
    Buzzsprout upload screen
  7. So, I upload the file to Buzzsprout, and also most times to Trint as well. What is Trint? Trint is a site that does transcription of audio files using AI. This means you get the transcription back in minutes, rather than the days it can take when you are relying on humans to do the transcription. Trint also has a free trial, so if you’re interested in trying it out, you have nothing to lose – really, it is not one of those free trials where they take your credit card details and make it hard for you to back out. As transcription goes, the output is quite good. It is not perfect, obviously and will need some work to clean it up, but it is fast, and it has an excellent interface for that inevitable clean-up. Then, I post the transcriptions here on this blog, along with the Buzzsprout player so anyone who is interested can listen to the podcast, and read along the text as well, see here for an example.

Ok, that’s it. Those are my seven steps to better podcasts. For now. I’m always learning, so I may do a follow-up as I learn more. If there is anything I missed, some further improvements you think I could make, or some questions you have, do please feel free to hit me up in the comments, or drop me an email.

Video production basics for social sustainability

Recording equipment

Of course, blogging should be only one of the weapons in your Social Sustainability arsenal.

Other tools you should be using include, FaceBook, Twitter (obviously), LinkedIn (their Groups feature particularly), Flickr and YouTube. I will be dealing with all of these tools in future posts – for now I’m going to have a quick talk about my video setup.

I publish videos for GreenMonk reasonably regularly over on the RedMonk TV channel on YouTube.

I’m often asked about the equipment I use to create the videos and, to be honest it is quite basic.

For remote interview videos, where the interviewee and I are not together, I typically use Skype video calling and a plug-in for Skype called Call Recorder which allows me to record both sides of the call. I then edit the video using iMovie – all very cheap and simple to deploy and yet the results can be surprisingly good.

But for higher quality videos you really need to be there with a decent video camera.

My video camera up to recently was my Sony Handycam (seen above on the right). I used it with a bluetooth wireless microphone to capture the audio and the resulting audio and video was quite good to be honest.

However, when I recently upgraded my personal camera for photographs, I chose a Canon EOS 7D (above in middle – see also on Amazon). This camera, as well as taking stills, can take full HD video so I now use this for stills and video and have one less camera to carry with me. Also, the camera, when coupled with a good lens like the EF-S 17-55mm f2.8 (see also on Amazon) on it in this picture, takes excellent quality video.

The biggest drawback of using the 7D as a video camera is that its inbuilt audio recording is poor. There are a number of ways of getting over this, such as the use of shotgun microphones connected to the audio input of the camera but I heard mixed reports on the quality from that.

I decided instead to opt for an external audio recorder. After a bit of research, I went with the Zoom H4n (seen above on left).

Now I record the audio on the H4n and the video on the 7D. I then import both the audio and video tracks into iMovie and splice them together. It’s a little bit extra work but the results are great.

Recently Adobe were good enough to comp me a copy of their video editing software Premiere Pro – I’m currently learning my way around that and looking forward to trying to use it for some real video work.

If you have any questions on video production, feel free to leave them in the comments – I can’t promise to be able to answer them but, if I can’t, perhaps someone else reading the question will!!!

You should follow me on Twitter here

Exporting to mp3 from Audacity on an Intel Mac

I upgraded to a shiny new Intel based MacBook Pro recently and I love it.

One problem that I hadn’t anticipated was that the Audacity plugin for exporting to mp3 is not available for the Intel Mac. I use Audacity all the time for editing my podcasts and for creating the mp3’s which I publish on PodLeaders.com and on the it@cork blog.

I kinda cheated in finding a way around this – I downloaded the Windows version of Audacity and installed it on my Windows XP installation on Parallels on my Mac. This version of Audacity can export to mp3 no problem.

So now, I am editing all my podcasts (and exporting to mp3) using Windows on the Mac – (yeuch!). I’ve no doubt there is a more straightforward way to do this but this is the hack I came up with being a blogger of very little brain!

Audacity aiff import problems

Audacity is an open source, cross-platform sound editing application. It is the sound editor I use for producing the PodLeaders and it@cork podcasts.

The process I use for producing the podcasts was:

  1. Record the interview using Skype and Wiretap Pro (with Wiretap Pro set to save as mp3)
  2. Import the mp3 file to Audacity and edit
  3. Export as mp3 and publish

After a recent conversation with Doug Kaye, I decided to try his Levelator application to get the levels on the recordings the same. This meant I had to change Wiretap Pro to output to aiff ( a lossless format) instead of mp3.

I did this and recorded a number of interviews successfully, saving the interviews as aiff. However, yesterday, when I went to edit the first of those interviews, I was disappointed that the Levelator couldn’t work with the files (gave an error and stopped trying to level them).

However, I was horrified when I tried importing the files into Audacity only to find that the imported files had massive echo problems, echo problems (!). No matter what I tried I couldn’t get rid of the echo and it made the audio useless.

Finally, I hit on a solution:

  1. Import the aiff files into iTunes
  2. Export from iTunes as mp3
  3. Import the mp3 file into Audacity – no echo (phew!)

I should have hit on this solution sooner but it had been a long day!